Seed Germination
Getting seeds to germinate isn’t an exact science, but some general knowledge of the science helps to get seeds off to a great start.
Water, air, light
Seeds need to be moist to germinate. At planting time, water the seedbed, plant the seeds to the depth that is stated on the seed packet, and then tap the soil down lightly and water the bed.
According to an article in Growing For Market, most vegetables (unlike flowers) are indifferent to whether they have light or darkness when germinating. Celery and lettuce do better with more light, so should be sown at the surface with a very light cover of soil.
Seeds need oxygen to germinate so don’t let them drown in too much water. Well-drained soil will help prevent this. Organic matter in the soil will help keep soil well-drained and also from crusting. Crusted soil is difficult for seeds.
Watering after sowing should be shallow and frequent. Seeds should always be moist. Spraying the seeds with a fine mist will minimize soil disturbance.
Soaking
Seeds can be soaked before planting. This helps seeds absorb all the water they need. After the soaking seeds will need a smaller amount of water to sustain their moisture level. This pre-soaking works better for big seeds as the smaller ones tend to clump together when pre-soaked. Small seeds can be drained and mixed with a dry material like coffee grounds or oatmeal to reduce the clumping.
Soak seeds overnight if they are large seeds like beans and peas. Soak smaller seeds for a shorter amount of time. Legume seeds should not be soaked so long that their seed coat splits. They will lose nutrients and become more vulnerable to disease attacks.
Pre-sprouting
Seeds can be sprouted before they go into the ground. The advantages are that you can have much better control over the seed’s environment. After soaking the seeds as described above, drain off the water and put seeds on a piece of window screen or in a small sieve. Put them in a cool place and rinse them twice a day. An alternative for keeping them wet is to wrap them lightly in wet paper towels.
Sprout seeds just until they’ve germinated to avoid snapping off longer sprouts. If you aren’t ready to plant, you can put the seeds in the refrigerator to slow down the growth.
This pre-sprouting process can also be done to test whether or not old seeds are still viable. Just pre-sprout a few of the questionable seeds to see how they do.
Supplementary Heat
Most seeds will germinate without additional heat, but for faster, more robust growth, a heat mat is a marvelous invention. It especially works well if you’re germination station is in a cool room, basement or garage.
I have used this heat mat with great success. It gently and reliably warms the seeds. My seeds that like heat look fantastic with this additional heat. These include tomatoes, eggplant, peppers, squash, cucumbers, and melons. I find this particular mat to be well-made and durable. It only uses 45 watts of power to warm the root area 10 to 20 degrees over the ambient temperature. Being safety conscious, I like that this mat is UL listed and has a waterproof construction. I wish it had a power cord that is longer than its six feet.
When using a heat mat your seeds will germinate so fast that you’ll need to keep an eye on them to prevent them from getting leggy. Make sure you have your grow lights set up, because you are going to need them very quickly– possibly within 2-3 days depending on what you are planting.
Optimal outdoor germination environments
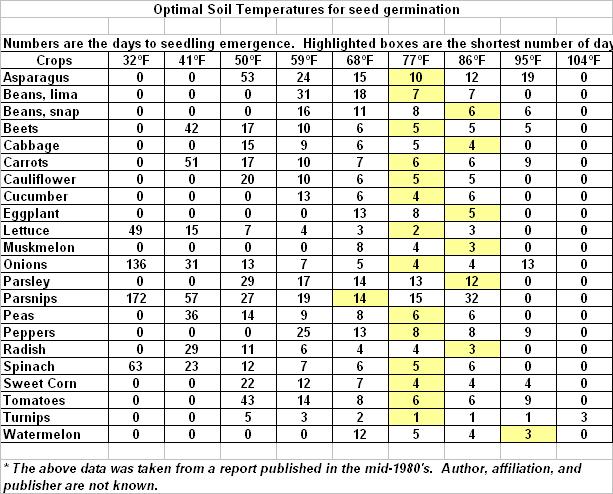
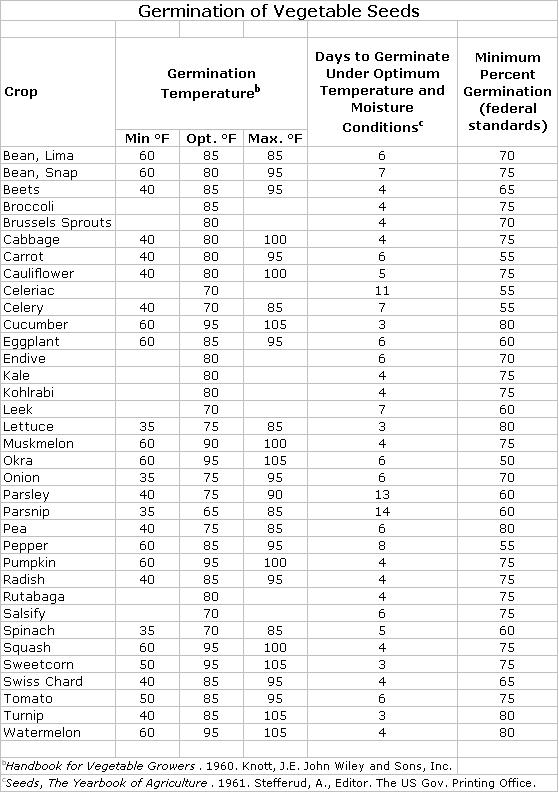
Below are two tables with seed germination preferential temperatures. The first is soil temperature. Below that is air temperatures.
Soil – not air – temperature is the trigger for seed germination. Soil temperature changes gradually. Factors that affect the process include the soil’s exposure to sunlight, its texture, moisture content and surface level (low-lying, flat or mounded).
Gardeners can expect particular soil temperatures to bring particular results. Most cool-loving garden vegetables germinate only when the soil reaches an average 45 degrees. Seeds for warm-loving plants wait until typical temperatures are above 55 F.
The only sure way to know when it’s safe to plant is to take the soil’s temperature.
Buy a metal probe thermometer with a flat dial that provides low readings (in other words, NOT an oven-temperature meat thermometer, although it looks similar). Plan to take your garden’s temperature between 10 and 11 a.m. – the midpoint between when daily temperatures are coolest (dawn) and warmest (late afternoon). Push the thermometer 1.5 to 2 inches into the soil at several locations.
I use this digital soil thermometer. It is easy to read with its digital display and it only takes about 30 seconds to stabilize and record my soil temperature. It’s really nice to have this soil information verified so quickly and easily.
Do NOT leave the thermometer in the ground. Store it indoors between readings.
A strong, long-lasting cold front can take soil temperatures down again, especially just after they’ve finally warmed to 45 or 55 F in spring. Because soil temperatures tend to rise and fall so slowly however, a reading of 45 or 55 degrees usually means it’s safe to plant.
Being planted too early isn’t always fatal for seeds. Many will simply sit and wait for the soil to warm up. But with warm-loving crops in particular, the seeds may not stay viable for very long. If they do germinate, their delay may affect the plants health or output.
The table shows optimal soil temperatures for various seeds.

If you’d prefer to rely on air temperature, here are the optimal environments for each vegetable.


